FRONT LEARN
FRONT LEARN
A perfect place to learn frontend development
Welcome to Front Learn, your ultimate destination for mastering frontend development. Whether you're a beginner or looking to enhance your skills, we've got you covered with comprehensive tutorials and hands-on projects.
Here's what you can expect:
So, what are you waiting for? Dive in and start your journey towards becoming a frontend development expert. Let's create something amazing together!
Access meticulously crafted tutorials, organized by chapters for systematic and convenient learning, covering all aspects from the fundamentals to advanced topics in frontend development.
Engage in real-time coding and practice simultaneously and yeah, utilize the integrated copy button feature provided for each code for efficient debugging and troubleshooting of your code.
"And yeah remember! It's not a bug,It's an undocumented feature "
So what are you waiting for, Start your frontend journey today.
Your Frontend Journey | Designed by Rajdeep with passion.
•Now, write the following code in your file
<!DOCTYPE html>
<html>
<head>
<title>My First HTML Page</title>
</head>
<body>
<h1>Pehla HTML Page</h1>
</body>
</html>
•Once you are done with writing this piece of code to run it go to your respective folder in file explorer and double click on index.html file and let the magic happen.
•Now what are you seeing is it similar to the below image.

•Now let's understand our code.
<!DOCTYPE html>
This is the first line of our code which tells the browser that this is an HTML document
<html>
This is the second line of our code which tells the browser that this is the start of our html content or document
<head>
This is the third line of our code which tells the browser that this is the head of the html document and all the metadata would be placed in this tag
<title>My First HTML Page</title>
This is the fourth line of our code which tells the browser that this is the title of our html document followed by closing tag
</head>
This is the fifth line of our code which tells the browser that this is the end of the head i.e closing tag of header
<body>
This is the sixth line of our code which tells the browser that this is the body of the html document inside which everything that would be visible on webpage would be coded
<h1>Pehla HTML Page</h1>
This is the seventh line of our code and also the starting of html content where we had written Pehla HTML Page inside heading tag (h1)
</body> </html>
These are the final line of our code where we had used closing tags for all the unclosed tags used in html document.
Used to describe headings in HTML documents and ranges from h1 to h6 used according to importance or preference of that particular heading.
➢How to use them?
                        <h1>India won against Australia</h1>

                                      to

                        <h6>Pakistan won against Zimbabwe</h6>
•Now what are you seeing is it similar to the below image.

Used to add paragraphs or texts in HTML documents.
➢How to use it?
<p>Cloud computing manages data, and social media connects globally, despite privacy concerns.</p>
•Now what are you seeing is it similar to the below image.

Used to add hyperlinks for redirecting to somewhere else in the document or to any other website.
➢How to use it?
<a href="https://www.wikipedia.org/">Wikipedia</a>
•Now what are you seeing is it similar to the below image.

Used to add images to your document.
➢How to use it?
                        <img src="./anyImage.png" alt="">

                     It is a self-closing tag, no need to add a separate closing tag for it.
•Now what are you seeing is it similar to the below image.

Used to break a running line.
➢How to use it?
                        <br>

                     It is a self-closing tag, no need to add a separate closing tag for it.
Used to make text bold, italic, or underlined.
➢How to use them?
                        <b>Bold Text</b>


                        <i>Italic Text</i>


                        <u>Underline Text</u>
•Now what are you seeing is it similar to the below image.

Used to draw a horizontal line in an HTML document.
How to use it?
                        <hr>

                     It is a self-closing tag, no need to add a separate closing tag for it.
Used to display text in subscript or superscript.
How to use them?
                        <p>H<sub>2</sub>O represents water</p>


                        <p>E = mc<sup>2</sup></p>
•Now what are you seeing is it similar to the below image.

There are 3 types of list
Used to create ordered lists with numbering or order.
➢How to use it?
<ol>
<li>DSA</li>
<li>Web Dev</li>
</ol>
•Now what are you seeing is it similar to the below image.

Used to create unordered lists without numbering or order.
➢How to use it?
<ul>
<li>DBMS</li>
<li>JAVA</li>
</ul>
•Now what are you seeing is it similar to the below image.

Used to create lists which need descriptions as well.
➢How to use it?
<dl>
<dt>C++</dt>
<dd>A powerful programming language</dd>
<dt>Rust</dt>
<dd>A safe systems programming language</dd>
</dl>
•Now what are you seeing is it similar to the below image.

➢Let's see the acronyms of the abbreviations used:
                        *ol : Ordered list
                        *ul : Unordered list
                        *dl : Description list
                        *li : List item
                        *dt : Definition term
                        *dd : Definition description
➢How to make a matrix of 2*2?
<table border="1">
<tr>
<td>0</td>
<td>1</td>
</tr>
<tr>
<td>2</td>
<td>3</td>
</tr>
</table>
•Now what are you seeing is it similar to the below image.

➢How to show data using table?
<table border="1">
<tr>
<th>Sr No.</th>
<th>Product</th>
</tr>
<tr>
<td>1</td>
<td>Hard Disk</td>
</tr>
<tr>
<td>2</td>
<td>SSD</td>
</tr>
<tr>
<td>3</td>
<td>Keyboard</td>
</tr>
</table>
•Now what are you seeing is it similar to the below image.

➢How to use rowspan and colspan in table?
<table border="1">
<tr>
<td rowspan="2">Table 1</td>
<td colspan="2">VIP Section</td>
<td rowspan="2">Table 2</td>
</tr>
<tr>
<td>Seat 1</td>
<td>Seat 2</td>
</tr>
<tr>
<td colspan="3">Main Hall</td>
<td rowspan="2">Table 3</td>
</tr>
<tr>
<td>Seat 1</td>
<td rowspan="2" colspan="2">Special Seating Area</td>
</tr>
<tr>
<td>Seat 2</td>
<td>Seat 3</td>
</tr>
</table>
•Now what are you seeing is it similar to the below image.

➢Let's see the acronyms of the abbreviations used:
                        *tr : Table Row
                        *td : Table Data
                        *th : Table Head
An id attribute in HTML is used to uniquely identify an element on a web page. It must be unique within the entire HTML document, meaning no two elements can have the same id.
➢How to use it?
                        <div id="header">
                           <h1>Welcome to our Website</h1>
                        </div>
A class attribute in HTML is used to specify one or more class names for an element. Unlike id, multiple elements can share the same class name.
➢How to use it?
<ul>
<li class="list-item">Item 1</li>
<li class="list-item">Item 2</li>
<li class="list-item">Item 3</li>
</ul>
➢Where to use them?
                        *id    : Use id when you need to uniquely identify a specific element, such as a main header or footer.
                        *class : Use class when you want to apply similar styling or functionality to multiple elements, such as formatting all buttons or styling a set of list items.
Forms are used to take input and collect from user
➢How to make a form ?
<form> form content </form>
➢Action is used to define that what action do we need to perform after form being submitted
<form action="index.php"> form content </form>
➢How to take input using forms?
Input can be taken by various types such as text,checkbox,textarea,select etc.
-
<input type="text"> : To take input from user in text format
-
<input type="checkbox"> : To take input from user by selecting checkbox
-
<textarea name="feedback"></textarea> : To take input from user in textarea format
-
<select name="year">
<option value="I yr">I yr</option>
<option value="II yr">II yr</option>
<option value="III yr">III yr</option>
</select> : To take input from user by choosing one option from many
•Now what are you seeing is it similar to the below image.

➢How to use it?
<h1 style = "color:red;">India won against Australia</h1>
•Now what are you seeing is it similar to the below image.

➢Let's quickly breakdown our code to see how it worked.
*Here using style attribute we are choosing to apply style on our heading.
*Then we are using color property to change the color of our heading.
As the name says we had to apply css inside the tag only as we had already used that.
<!DOCTYPE html>
<html>
<head>
<title>Inline CSS Example</title>
</head>
<body>
<p style="color: red; font-size: 20px;">This is a paragraph with inline CSS.</p>
</body>
</html>
•Now what are you seeing is it similar to the below image.

We had to apply css inside head tag here with <style>{ }</style>.
<!DOCTYPE html>
<html>
<head>
<title>Internal CSS Example</title>
<style>
p {
color: blue;
font-size: 18px;
}
</style>
</head>
<body>
<p>This is a paragraph with internal CSS.</p>
</body>
</html>
•Now what are you seeing is it similar to the below image.

We had to apply css extrenally in any other file.
Now here is a catch you had to follow below steps to use external css
* HTML File(index.html)
<!DOCTYPE html>
<html>
<head>
<title>External CSS Example</title>
<link rel="stylesheet" href="styles.css">
</head>
<body>
<p>This is a paragraph with external CSS.</p>
</body>
</html>
* CSS File(styles.css)
p {
color: green;
font-size: 16px;
}
•Now what are you seeing is it similar to the below image.

So to use css through id or class or tag names etc. we had to use selectors
Used to target any content within any particular tag.
Used to target any content belonging to any particular class.
Used to target any content belonging to any particular Id.
➢How to use them?
<!DOCTYPE html>
<html>
<head>
<title>Combined Selectors Example</title>
<style>
#header {
background-color: lightblue;
color: white;
text-align: center;
padding: 10px;
}
.highlight {
background-color: yellow;
font-weight: bold;
}
p {
color: green;
font-size: 16px;
}
p.highlight {
color: blue;
}
</style>
</head>
<body>
<div id="header">
<h1>This div uses an ID selector</h1>
</div>
<p>This paragraph uses an element selector.</p>
<p class="highlight">This paragraph uses a class selector and also a combined class and element selector.</p>
<p>This is another paragraph using an element selector.</p>
<p class="highlight">This paragraph uses a combined class and element selector.</p>
<div class="highlight">
<p>This div uses a class selector.</p>
</div>
</body>
</html>
•Now what are you seeing is it similar to the below image.

There are numerous number of properties that can be applies on text.
Most used ones are listed and used below.
➢How to use them?
<!DOCTYPE html>
<html>
<head>
<title>Text Properties Example</title>
<style>
.underlined-text {
text-decoration: underline;
}
.bold-text {
font-weight: bold;
}
.uppercase-text {
text-transform: uppercase;
}
.spaced-text {
line-height: 1.5;
}
.custom-font-text {
font-family: Arial, sans-serif;
}
.centered-text {
text-align: center;
}
</style>
</head>
<body>
<p class="underlined-text">This text is underlined.</p>
<p class="bold-text">This text is bold.</p>
<p class="uppercase-text">This text is uppercase.</p>
<p class="spaced-text">This text has increased line spacing.</p>
<p class="custom-font-text">This text uses a custom font (Arial, sans-serif).</p>
<p class="centered-text">This text is centered.</p>
</body>
</html>
•Properties that has been used here :
                        *[text-decoration: underline]      : underlined the text
                        *[font-weight: bold;]              : made the text bold
                        *[text-transform: uppercase;]      : tranformed entire text to uppercase
                        *[line-height: 1.5;]               : increased the line spacing
                        *[font-family: Arial, sans-serif;] : used custom font
                        *[text-align: center;]             : centered the text
•Now what are you seeing is it similar to the below image.

Maybe like height or width or thickness or some other properties of box.
So you now got your answer box model is nothing but treating any div or section or anything else like box and applying properties on it.
Most used ones are listed and used below.
➢How to use them?
<!DOCTYPE html>
<html>
<head>
<title>Box Model Example</title>
<style>
.box {
width: 200px;
height: 150px;
border: 2px solid #333;
padding: 20px;
margin: 30px;
background-color: #f0f0f0;
}
</style>
</head>
<body>
<div class="box">
This is a box.
</div>
</body>
</html>
•Properties that has been used here :
                        *width   : Determines element's horizontal size.
                        *height  : Sets element's vertical size.
                        *border  : Outer edge styling.
                        *padding : Space inside border.
                        *margin  : Space outside border.
•Now what are you seeing is it similar to the below image.

It is a one-dimensional layout method for arranging items in rows or columns.
Most used ones properties of flex box are listed and used below.
➢How to use them?
<!DOCTYPE html>
<html>
<head>
<title>Flexbox Basics</title>
<style>
.flex-container {
display: flex;
flex-wrap: wrap;
justify-content: space-around;
align-items: center;
height: 300px;
background-color: #f0f0f0;
border: 1px solid #ccc;
padding: 10px;
}
.flex-item {
display: flex;
justify-content: center;
align-items: center;
width: 100px;
height: 100px;
background-color: #6495ED;
margin: 5px;
font-size: 18px;
color: white;
}
</style>
</head>
<body>
<div class="flex-container">
<div class="flex-item">1</div>
<div class="flex-item">2</div>
<div class="flex-item">3</div>
<div class="flex-item">4</div>
<div class="flex-item">5</div>
<div class="flex-item">6</div>
</div>
</body>
</html>
•Properties that has been used here :
                        *[display: 'flex;']                 : Determines element's horizontal size.
                        *[flex-wrap: 'wrap;']               : Sets element's vertical size.
                        *[justify-content: 'space-around;'] : Outer edge styling.
                        *[align-items: 'center;']           : Space inside border.
                        *[justify-content: 'center;']       : Space outside border.
•Now what are you seeing is it similar to the below image.

State changes includes many actions such as hovering etc..
Most used ones transitions are listed and used below.
➢How to use them?
<!DOCTYPE html>
<html>
<head>
<title>CSS Transitions and Transforms Example</title>
<style>
.box {
width: 200px;
height: 200px;
background-color: #6495ED;
color: white;
text-align: center;
line-height: 200px;
font-size: 24px;
margin: 50px auto;
cursor: pointer;
transition: transform 1s ease-in-out;
}
.box:hover {
transform: rotate(360deg) scale(1.2) skew(10deg, 5deg) translate(20px, 20px);
background-color: #FFA500;
}
</style>
</head>
<body>
<div class="box">
Hover Over Me
</div>
</body>
</html>
•Properties that has been used here :
                        *transition : Specifies transition effects on hover.
                        *transform  :  Applies 2D/3D transformations like rotate, scale, skew, translate.
                        *rotate     : Rotates the element by degrees.
                        *scale      : Scales the element size.
                        *skew       : Skews the element along axes.
                        *translate  : Moves the element in the specified direction.
•Now on hovering over it what are you seeing is it similar to it. .
➢How to use it?
*HTML File
<!DOCTYPE html>
<html>
<head>
<title>First JavaScript File</title>
</head>
<body>
<h1>Phla JS Page</h1>
<script src="script.js"></script>
</body>
</html>
*JS File
console.log("Successfully compiled first js page");
*Left click and click on inspect and then click on console
*(Bonus tip)
You can also use ctrl+shift+j to open console
•Now what are you seeing is it similar to the below image.

➢Let's quickly breakdown our code to see how it worked.
*console.log() is used to write something from user side or client side on console window.
*When we written console.log("Succesfully compiled first js page"); in js file and opened the file this text was visible in console.
➢Let's see how to declare a variable in js.
•So there are 3 ways of declaring variables :
➢How to use a variable?
*HTML File
<!DOCTYPE html>
<html>
<head>
<title>Learning about Variables</title>
</head>
<body>
<h1>Variables</h1>
<script src="script.js"></script>
</body>
</html>
*JS File
let name = "Sachin"; //Declaring a variable
console.log(name);
*Now open console you will see Sachin there without directly passing it
to console.log and you can use it anywhere also.
•Now what are you seeing is it similar to the below image.

➢Some rules to keep in mind while declaring variables.
*Allowed characters for variable name are letters,digits and underscore(_).
*Digits can't be first letter of variable name.
*Variable name are case sensitive "q" and "Q" are different.
*Variable name can't be a reserved keyword.
•In simple words, Operators are used to perform some operation on data.
•There are 3 types of operators in JS.
Let's study them one by one
➢Arithemetic Operators
These operators are used to perform arithmetic operations on numeric values.
It includes basic operations like addition,subtraction,multiplication,division etc.
➢Assignment Operators
Assignment operators are used to assign values to variables.
They include the basic assignment operator "="" which assigns the value on the right-hand side to the variable on the left-hand side.
Compound assignment operators like "+=", "-=", "*=", "/=" etc. combine arithmetic operations with assignment.
➢Comparision Operators
Comparison operators are used to compare two values or expressions.
They return a Boolean value (true or false) based on whether the comparison is true or false.
Examples include == (equal to), != (not equal to), === (strictly equal to), !== (strictly not equal to), > (greater than), < (less than), >= (greater than or equal to), and <= (less than or equal to).
*HTML File
<!DOCTYPE html>
<html>
<head>
<title>Operators in JS</title>
</head>
<body>
<h1>Operators</h1>
<script src="script.js"></script>
</body>
</html>
*JS File
//Arithmetic Operators
console.log("Arithmetic Operators");
var a = 10;
var b = 20;
var c = a + b;
console.log(c); //30
//Assignment Operators
console.log("Assignment Operators");
var a = 10;
var b = 20;
b+=a;
console.log(b); //30
//Comparison Operators
console.log("Comparison Operators");
var a = 10;
var b = 20;
var c = a == b;
console.log(c); //false
•Now what are you seeing is it similar to the below image.

➢Array
So what is an array?
It's a collection of items,Now if you are here after studying any programming language then to notify you that arrays here are different from those, Items in js array can be heterogeneous(of different data type).
*HTML File
<!DOCTYPE html>
<html>
<head>
<title>Array in JS</title>
</head>
<body>
<h1>Array</h1>
<script src="script.js"></script>
</body>
</html>
*JS File
//Creating an Array
//Homogeneous Array
let items = ["copy","pen","pencil"];
//Heterogeneous Array
let bought = [2,"copies"];
//Printing arrays
//directly
console.log("Printing directly");
console.log(items);
console.log(bought);
//using loops
console.log("Printing using loops");
for (let item of items) {
console.log(item);
}
for(let what of bought){
console.log(what);
}
//Methods in arrays
//length
console.log("Length of item array "+items.length);
//push and pop
items.push("book");
console.log("After pushing book "+items);
items.pop();
console.log("After popping book "+items);
//toString
console.log("toString of items "+items.toString());
//Concating
let arr = items.concat(bought);
console.log("Concating items and bought "+arr);
//Shift and Unshift
items.unshift("geometry box");
console.log("After unshift "+items);
items.shift();
console.log("After shift "+items);
//Slice
console.log("Slice of items "+items.slice(1,3));
//Splice
items.splice(1,1);
console.log("After splicing items "+items);
•Now what are you seeing is it similar to the below image.

➢String
So what is a string?
A string is a sequence of characters used to represent text.
*HTML File
<!DOCTYPE html>
<html>
<head>
<title>String in JS</title>
</head>
<body>
<h1>String</h1>
<script src="script.js"></script>
</body>
</html>
*JS File
//Creating an String
let str = " practice strings";
//Printing string
//directly
console.log("Printing directly");
console.log(str);
//Using loops
console.log("Printing using loops");
for (let i = 0; i < str.length; i++) {
console.log(`Index ${i}: ${str[i]}`);
}
//Methods in string
//length
console.log("Length of string "+str.length);
//converting to uppercase or lowercase
console.log("All letters UpperCase "+str.toUpperCase());
console.log("All letters LowerCase "+str.toLowerCase());
//trimming string
console.log("Trimmed string "+str.trim());
// you won't be able to see trim because what it did is it removed initial whitespace
//replace
console.log("After replacing "+str.replace("practice","teaching"));
//slice string
console.log("Sliced string "+str.slice(0,5));
//concat string
console.log("Concated string"+str.concat(" is fun"));
•Now what are you seeing is it similar to the below image.

•There are 2 ways to do it either type that action again and again or second way(the smarter way) using loops.
•There are many loops in JS, but here we would study for loop, while loop, do-while loop, for-of loop, for-in loop.
Let's study them one by one
*HTML File
<!DOCTYPE html>
<html>
<head>
<title>Loops in JS</title>
</head>
<body>
<h1>Loops</h1>
<script src="script.js"></script>
</body>
</html>
*JS File
//for loop
console.log("for loop");
for(var i=1;i<=5;i++){
console.log("Printing "+i+" through for loop");
}
//while loop
console.log("while loop");
var i=1;
while(i<=5){
console.log("Printing "+i+" through while loop");
i++;
}
//do-while loop
console.log("do-while loop");
var i=6;
do{
console.log("Printing "+i+" through do-while loop");
i++;
} while(i<=5);
// Did you noticed something strange here even though i=6 so the condition is incorrect still the loop ran 1 time .
// That's because do-while loop runs at least once.
//for-of loop
// Array to demonstrate for-of loop
let array = [1, 2, 3, 4, 5];
console.log("for-of loop");
for (let num of array) {
console.log(`Printing ${num} through for-of loop`);
}
//for-in loop
// Object to demonstrate for-in loop
let obj = {a: 1, b: 2, c: 3};
console.log("for-in loop");
for (let key in obj) {
console.log(`Printing ${key}: ${obj[key]} through for-in loop`);
}
•Now what are you seeing is it similar to the below image.

Let's see how a function works.
*HTML File
<!DOCTYPE html>
<html>
<head>
<title>Functions in JS</title>
</head>
<body>
<h1>Functions</h1>
<script src="script.js"></script>
</body>
</html>
*JS File
// function without return value(void function)
// body of function
function greet(name) {
console.log("Hello "+name);
}
// invoking function
greet("John");
// function with some returning value
// body of function
function sum(a, b) {
return a + b;
}
// invoking function
console.log(sum(10, 20));
•Now what are you seeing is it similar to the below image.

➢Let's discuss more about DOM.
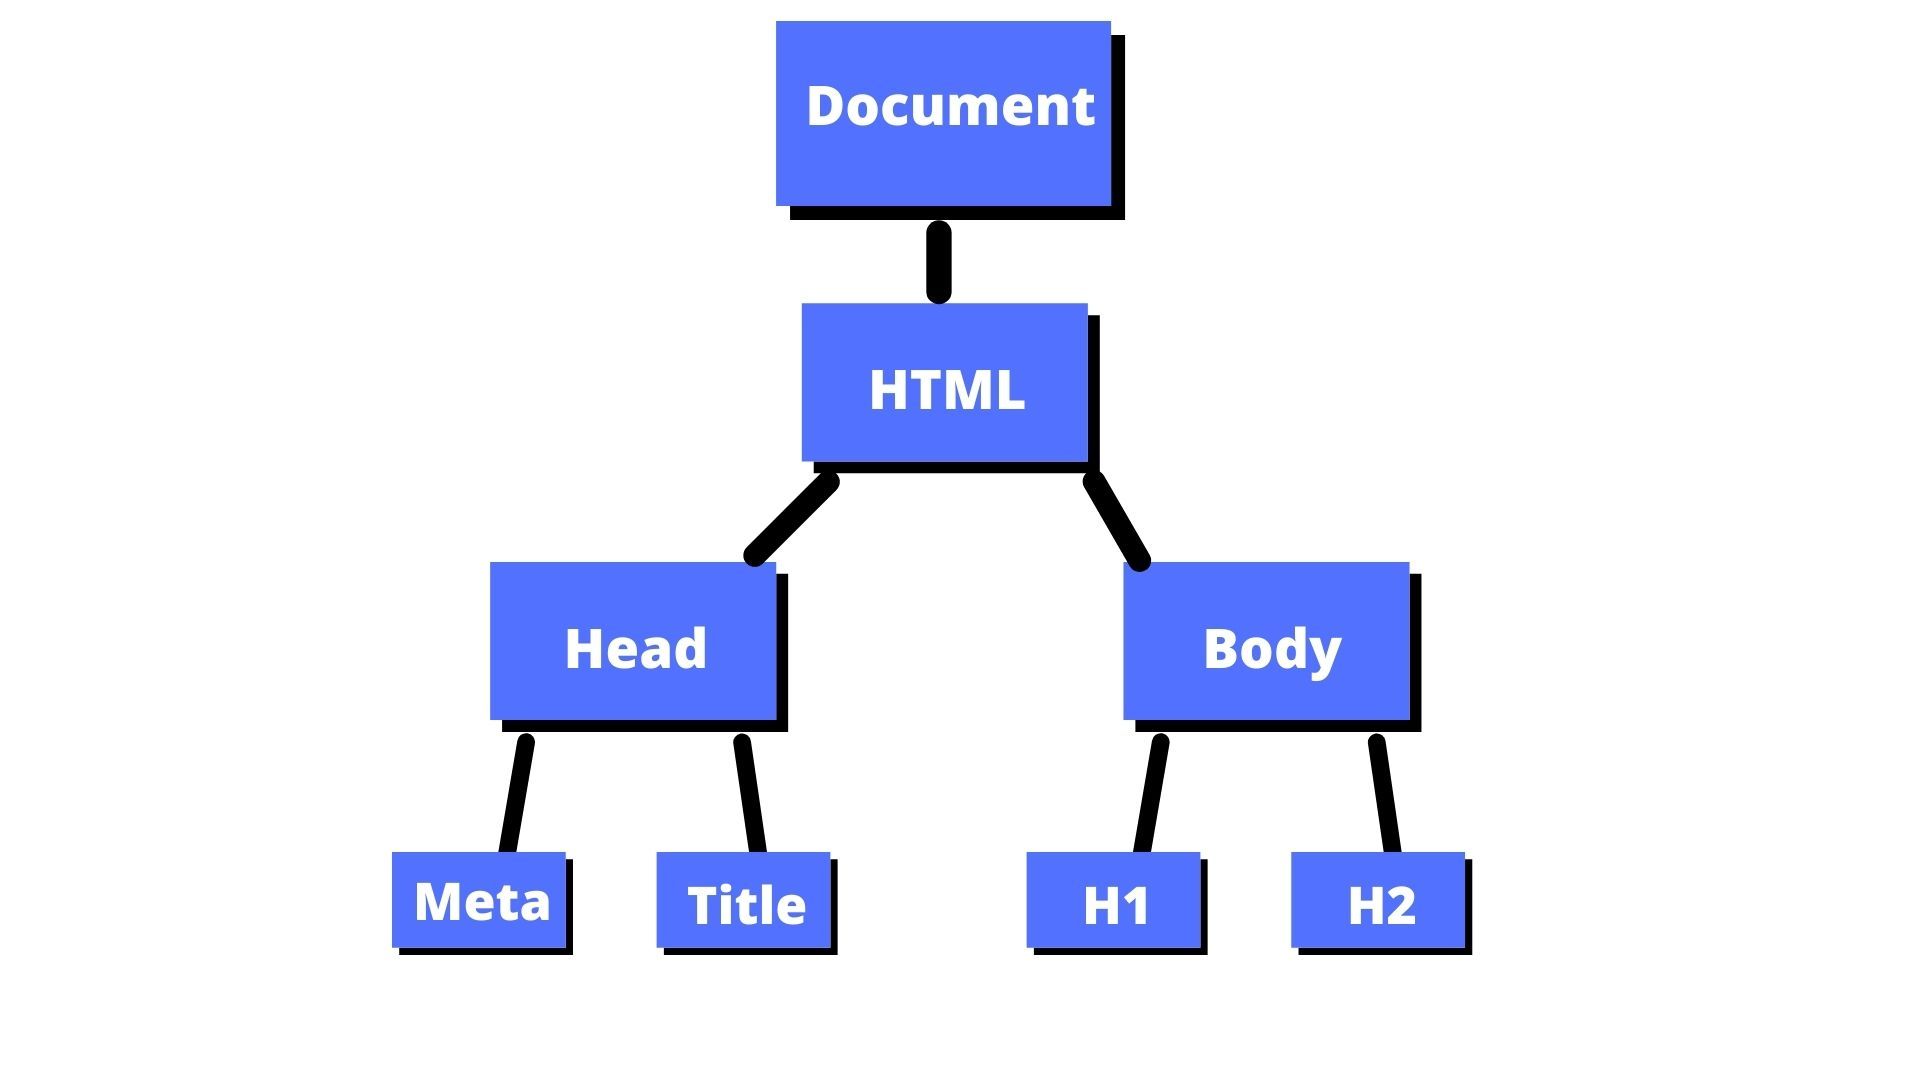
➢What is DOM?
•DOM is a tree-like structure that represents the HTML document.
➢Now let's see dynamic changes through DOM
*HTML File
<!DOCTYPE html>
<head>
<DOM Manipulation>Title</title>
<style>
body{
font-size: large;
font-weight: bold;
}
</style>
</head>
<body>
<p>Selecting by Tag (Click me)</p>
<div id="myId">Selecting by Id (Click me)</div>
<div class="myClass">Selecting by Class (Click me)</div>
<div id="queryId">Query Selector (Click me)</div>
<div class="queryClass">Query Selector All (Click me)</div>
<div class="queryClass">Query Selector All (Click me)</div>
<script src="index.js"></script>
</body>
</html>
*JS File
// Selecting elements
const selectByTag = document.getElementsByTagName("p")[0];
const selectById = document.getElementById("myId");
const selectByClass = document.getElementsByClassName("myClass");
const querySelect = document.querySelector("#queryId");
const querySelectAll = document.querySelectorAll(".queryClass");
// Adding event listeners
selectByTag.addEventListener('click', function() {
this.textContent = 'Selecting by Tag (Clicked!)';
this.style.backgroundColor = 'blue';
});
selectById.addEventListener('click', function() {
this.textContent = 'Selecting by Id (Clicked!)';
this.style.backgroundColor = 'green';
});
for (let i = 0; i < selectByClass.length; i++) {
selectByClass[i].addEventListener('click', function() {
this.textContent = 'Selecting by Class (Clicked!)';
this.style.backgroundColor = 'red';
});
}
querySelect.addEventListener('click', function() {
this.textContent = 'Query Selector (Clicked!)';
this.style.backgroundColor = 'purple';
});
querySelectAll.forEach(element => {
element.addEventListener('click', function() {
querySelectAll.forEach(item => {
item.textContent = 'Query Selector All (Clicked!)';
item.style.backgroundColor = 'orange';
});
});
});
•Now what are you seeing is it similar to the below image.

Here are some resources to help you continue your learning journey:
Remember to keep learning! The world of frontend development is constantly evolving. Stay curious and explore new technologies and techniques.
Practice regularly and challenge yourself with new projects. Consistency is key to mastering your skills.
Document your learning journey. Build a portfolio showcasing your projects and achievements to demonstrate your skills to potential employers.
Stay updated with industry trends and best practices. Follow blogs, attend webinars, and join online communities to network with fellow developers.
I promise to keep updating this website with new content and challenges to help you grow as a frontend developer. Stay tuned for more exciting features!
Look forward to more advanced topics, detailed tutorials, and practical examples that will deepen your understanding of frontend development.
Expect guidance on frontend frameworks such as React, Vue.js, and Angular, along with tips for integrating backend technologies like Node.js and databases.
I am committed to providing resources that promote accessibility, performance optimization, and responsive design practices.
Join coding communities, attend workshops, and participate in hackathons to stay motivated and inspired. Collaborating with others will expand your knowledge and skills.
Follow industry leaders and influencers on social media platforms to stay updated with the latest trends, tools, and opportunities in frontend development.
Read books and articles on software development, design patterns, and user experience to deepen your understanding and broaden your perspective.
Experiment with personal projects and contribute to open-source initiatives to gain practical experience and showcase your abilities to potential employers.
Frontend development is a journey of continuous learning. Engage with the community, share your knowledge, and learn from others.
Contribute to open-source projects and attend local meetups or virtual conferences to stay connected with fellow developers.
Explore new technologies and frameworks, and keep honing your skills to stay competitive in the rapidly evolving tech industry.
Build a strong online presence through a professional portfolio and active participation in tech communities.
Network with professionals in the field and seek mentorship to gain insights and guidance for career advancement.
Stay organized and manage your projects efficiently using tools like project management software and version control systems.
Stay curious and maintain a passion for learning to continuously improve your skills and achieve your career goals.
Frontend development is not just about coding; it's about creativity, problem-solving, and continuous growth.
Reflect on your journey, celebrate your achievements, and learn from challenges to become a better developer and individual.
Embrace feedback and strive for excellence in everything you do. Your dedication and passion will pave the way for a rewarding career in frontend development.
Your Frontend Journey | Designed by Rajdeep with passion.
Ok, so not "us" - currently, it's just me! Hello! I'm Rajdeep Singh Rathore, currently pursuing my Master of Computer Applications (MCA) at the National Institute of Technology (NIT), Warangal.
Welcome to my frontend web development learning platform! I'm passionate about helping you learn and grow your skills in web development.
"Empowering aspiring web developers one tutorial at a time."
My Motivation
Creating this website has been a journey fueled by my passion for web development and a desire to help others learn the basics of frontend development. As I embarked on my own learning path, I realized the importance of a solid foundation in web development and wanted to share my knowledge with others.
Purpose of the Website
This website serves a dual purpose:
What's Next
As I continue to learn and grow in the field of web development, I aim to expand this website with more advanced tutorials, resources, and interactive content. My goal is to create a comprehensive learning hub for aspiring web developers.
In addition to tutorials, I plan to include:
Thank you for visiting, and I hope you find the resources here helpful and inspiring on your own journey in web development.
Our Vision
Our vision is to be the leading online platform empowering individuals worldwide to master web development through accessible and high-quality educational resources.
Our Mission
Our mission is to provide comprehensive, beginner-friendly tutorials and resources that enable aspiring web developers to build a strong foundation in frontend development. We strive to foster a supportive learning community and inspire confidence in our learners' abilities.
We are committed to continuous improvement, staying updated with industry trends, and delivering engaging content that meets the evolving needs of our audience.
Join us in our mission to make learning web development accessible and enjoyable for everyone!
Contribute
We welcome contributions from the community! If you have a tutorial, article, or project that you'd like to share with our audience, please reach out to us. Your contributions help us expand our resources and provide diverse perspectives.
Feedback
Your feedback is invaluable to us. Whether you have suggestions for improvement, topics you'd like to learn more about, or questions about our content, we want to hear from you! Send us your thoughts and help us enhance your learning experience.
Thank you for visiting our frontend web development learning platform. We appreciate your interest and hope you find our resources valuable in your journey to mastering web development.
Your support and feedback help us improve and expand our content, making it more beneficial for learners worldwide. We look forward to continuing this journey with you!
Your Frontend Journey | Designed by Rajdeep with passion.